Friday, September 6, 2013

Windows Server 2012 – The New and Improved Group Policy Management Console


With Windows Server 2012, there are tools, features and functions that are available from the first member server (or Win8 PC with the RSAT pack - http://www.microsoft.com/en-us/download/details.aspx?id=28972).

You don't need a schema extension, you don't need to deploy any 2012 Domain Controllers, you don't need to flip the bit to Domain or Forest Functional Levels. All you need to do is install the OS and install/enable the Remote Server Administration Tools.
In this post, I'll show you some things in the updated "Group Policy Management Console" (GPMC).

Before I show off some of the coolness of the new GPMC, hop on the 'way-back' machine and recall the joys of GPO editing circa Windows 2000….anyone remember doing that?

The GPMC is one of those rare IT gems – free, easy to use without too much ramp-up or massive whitepapers to pour through before you're able to make use of the tool and get some work done.

We got it right with that tool….and it has some great improvements in 2012.

Group Policy Infrastructure Status

When you open the GPMC, there is now a 'Status' tab. This shows 'at-a-glance' replication status of the Group Policy elements across your DCs.
  • Repeating: You don't need any WS 2012 DCs to see this data – GPMC can get the information from W2k3 and newer DCs.
This first screen shot shows that "Infrastructure Status" data has not been gathered yet for this domain and that DC01 is the current "baseline domain controller" (which can be changed).

Click "Detect Now" at the bottom of the tab to initiate the data gathering and comparison against the baseline DC.

** WARNING ** This can take some time in a large AD environment, as it has to check multiple items on EACH DC in the domain.


Click the circle-arrow buttons to see more detail … currently showing that all four GPOs in the domain are in full sync between my baseline DC and my one other DC.


Refresh the console to see how the DCs drift from full sync as GPOs are edited and replication occurs…


If you click the "GPO version" link under "Active Directory" or "SysVol", a dialog displays which shows the version numbers for the GPO(s) not yet in sync…


Refresh the console again to see the replication status settle back into full sync against the baseline DC…


Here's a screenshot of the same process with the "baseline domain controller" being a 2003 R2 DC which also hosts all 5 FSMOs in my lab domain/forest.


And the Domain/Forest functional levels are still at 2003


Remote GP Update

Next up is remote GP Update – yes ladies and gentlemen, you can select an OU and choose to initiate a GPUpdate /FORCE on the computers within that OU.


Two computers are found in the target OU (and any sub-OUs)…


The update fails against one. We can "Save" the log to a CSV file for documentation, historical tracking or further troubleshooting work.


I opened the appropriate firewall ports via the "Group Policy Remote Update Firewall Ports" Starter GPOs which are part of WS 2012, too. I was then able to update the failing system.


The way this works, is it creates a Scheduled Task to run GPUPDATE /FORCE on each system in the OU for both USER and COMPUTER portions of the GPO(s).
  • This only works on Vista/2008 and newer OS instances
  • Uses a random offset of 0-10 minutes for each system, so they don't all jump at once
  • A command-prompt window will display when the Task executes on the target machine(s) if a user is logged in – beware possible end-user confusion and possible help-desk calls when this happens
  • The UI is an 'all-or nothing' situation. It will refresh GPOs on all systems within the OU – if you need some granularity, you need some (surprise!) Powershell via…
      • Allows you to target one or more specific computers (instead of all in an OU/subOU)
      • Allows you to set specific time offset/delay (instead of 0-10 minutes)
      • Allows you to restart the target PC or log off any logged on user (if you need to ensure that Policy settings that require a restart or log-off/on get refreshed)
      • Other flexible options
      • Example: Invoke-gpudate –computer DHCP01 –randomdelayminutes 1 –force
        • Does a GPUPDATE /FORCE for user and computer Policies on a computer named DHCP01 with a 1 minute delay
    • While you're browsing Powershell as it relates to GPOs, please take a quick look at the "Backup-GPO" cmdlet

GP Reporting

Wrapping up this post, have a look at the GP Reporting improvements (both in Results and Modeling):


A few items of note here:
  • Displays visually, right at the top of the report, if/when inheritance is blocked – an immediate flag in terms of troubleshooting
  • Displays visually, right at the top of the report, if/when a GPO is Enforced– an immediate flag in terms of troubleshooting
  • Whether or not a fast link was detected.
  • When Policy was last refreshed and how long it took
  • Active links for recent GPO Event Log data on the target machine
Broken record repeat - important note – the updated GPMC tool is ready to go as soon as you deploy your first WS 2012 or Win8 member system w/ RSAT tools installed and enabled.
  • No ADPREP needed
  • No WS 2012 DCs required
  • No domain functional levels required

How to install WSUS 3.0 SP2 on Windows Server 2012 Essentials

In Windows Server 2012 Essentials, you cannot install WSUS because the “Windows Server Update Services” role is missing in Server Manager.
The Windows Server Essentials team has released a hotfix that brings the WSUS role back to Windows Server 2012 Essentials. Use the following steps to fix and install WSUS 3.0 SP2 on the server:
  1. View the KB article 2762663 : “You cannot enable the Windows Server Update Service role in Windows Server 2012 Essentials
  2. To download the hotfix from the KB article, click the link :  

    Note: You will need to provide your email address and the hotfix download location will be emailed to you from hotfix@microsoft.com.
  3. Save the hotfix package on the server running Windows Server 2012 Essentials and install it. 
  4. Restart your server. 
  5. Turn on Windows Server Update Services(WSUS) as follows:
    1. Open Server Manager
    2. Click add Roles and Features,
    3. In Select Server Roles, select Windows Server Update Services, and finish the wizard.
      image

Sample WSUS configuration on Windows Server 2012 Essentials:

Here are some sample steps you can follow to continue the WSUS configuration, Once the WSUS installation has finished, you can see it in Server Manager or Start Screen. In the Server Manager, you will be prompted to run the Post-Installation task of WSUS which will let you choose the location to store updates on the server and then initialize the WSUS configuration.

Step 1: Configure WSUS server settings

  1. Launch the WSUS configuration wizard by using Tools > Windows Server Update Services in Server Manager.
  2. Click Next on the Before you begin screen.
  3. Please consider if you want to join Microsoft Update Improvement Program. If so, please choose Yes, I will like to join the Microsoft Update Improvement Program.
  4. On the Choose Upstream Server page, you have the option to synchronize the updates with Microsoft Update or with another WSUS server. If you don’t have upstream WSUS server, please choose Synchronize Microsoft Update.
  5. After selecting the proper options for your deployment, click Next to proceed.
  6. On the Specify Proxy Server page, select the Use a proxy server when synchronizing check box if you have a proxy in your network, and then type the proxy server name and port number (port 80 by default), user name and credentials in the corresponding boxes.
  7. Click Next.
  8. On the Connect to Upstream Server page, click Start Connecting. When it connects, click Next to proceed.
  9. Please choose update Language, Products, Classifications settings one by one.
  10. On the Set Sync Schedule page, choose whether to perform synchronization manually or automatically.
  11. On the Finished page, you have the option to start the synchronization now by selecting the Begin initial synchronization check box.
  12. After you click Finish, the configure WSUS task is done and the WSUS Management Console appears.

Step 2: Deploy WSUS settings to clients via domain GPO

  1. In the Group Policy Management Console (GPMC), create a new GPO and then right click the GPO, choose Edit.
  2. In the GPMC, expand Computer Configuration, expand Policies, expand Administrative Templates, expand Windows Components, and then click Windows Update.
  3. In the details pane, double-click Configure Automatic Updates.
  4. Click Enabled, and then click one of the following options under the Configure automatic updating setting:
    • Notify for download and notify for install. This option notifies a logged-on administrative user before you download and install the updates.
    • Auto download and notify for install. This option automatically begins downloading updates and then notifies a logged-on administrative user before installing the updates.
    • Auto download and schedule the install. This option automatically begins downloading updates and then installs the updates on the day and time that you specify.
    • Allow local admin to choose setting. This option lets local administrators to use Automatic Updates in Control Panel to select a configuration option. For example, they can choose a scheduled installation time. Local administrators cannot disable Automatic Updates.
  5. Click OK.
  6. In the Windows Update details pane, double-click Specify intranet Microsoft update service location. By default WSUS will use port 8530 for HTTP and 8531 for HTTPS. For example, you can type http://servername or http://servername:8530
  7. Click Enabled, and then type the URL of the same WSUS server in the Set the intranet update service for detecting updates box and in the Set the intranet statistics server box. You can type in the same address above and then click OK.

    image
On the client machines, we can run the command: gpupdate /force to force the client machine refresh the GPO settings on the computer. Once the new GPO settings are applied, you can go to Control Panel, open Windows Update and check the status. It will shows that the update settings are managed by the system administrator. If so, the Windows Update GPO was applied on the client machine successfully.

Step 3: Create computer group in WSUS console

  1. In the WSUS Administration Console, expand Computers, right-click All Computers, and then click Add Computer Group.
  2. In the Add Computer Group dialog box, specify the Name of the new test group, and click then Add. For example, a group called: Servers and a Group named: Clients
  3. Click Computers, and then select the computers that you want to assign to this new group.
  4. Right-click the computer names that you selected in the previous step, and then click Change Membership.
  5. In the Set Computer Group Membership dialog box, select the test group that you created, and then click OK.
Alternatively, you can use the following method to let the WSUS server atomically change computers’ membership in WSUS console.

How To Install Exchange Server 2007 Steps

Microsoft Exchange Server 2007 has a lot to offer, including new capabilities, more efficiency, advanced protection, and many other advantages over its predecessors.
For those of you who have already made the decision to move up to the new version of Exchange. 

We’ll go through all of the steps you’ll need to successfully install Exchange Server 2007 on Windows Server 2003. If you’re using Server 2008 instead, then check out this how-to article on installing Exchange Server 2007 on Windows Server 2008.
Before we get started, you should make sure that your machine meets the minimum system requirements. As with any operating system installation, this is a critical step that you don’t want to overlook. 

Microsoft recommends for every administrator to check the network, hardware, software, client computer as well as other recommended elements before the actual Microsoft Exchange Server 2007 installation. For more information about the minimum system requirements see Microsoft TechNet.

Installing Exchange Server 2007

1. For our installation, we will be using the Exchange Server 2007 Setup Wizard.So start by logging on to the server on which you want to do the install and insert the Exchange Server 2007 DVD into the DVD drive. Setup.exe will automatically start.

2. On the Start page complete steps 1 through 3:
  • Step 1: Install .NET Framework 2.0
  • Step 2: Install Microsoft Management Console (MMC)
  • Step 3: Install Microsoft Windows PowerShell
Note: If you already have these installed on your server you will automatically be taken to the next step.

3. The physical installation of Exchange Server is the fourth step in the installation process. Once you’re ready to continue, click on:
  • Step 4: Install Microsoft Exchange
Exchange Server 2007 Install 1
And in the Introduction window click on Next
Exchange Server 2007 Install 2
4. Click on the I accept the terms in the license agreement option and click Next
Exchange Server 2007 Install 3
5. Select Yes or No for the Error Reporting option. In my example I’m going to enable this feature. When ready, click on Next
Exchange Server 2007 Install 4
6. Select one of the installation types listed. I’m going to select the Typical Exchange Server Installation. In this window you may also specify the path for the installation; I’m going to accept the default. When ready, click Next
Exchange Server 2007 Install 5
7. In the next window you can specify client settings. Click on the Yes option if you think that one of your clients might have Outlook 2003 on his or her system.
If you are positive that all client computers have Outlook 2007 installed, you may click on No. When ready, click on Next to continue
Exchange Server 2007 Install 6
8. Once the Readiness Checks are done running, click on the Install button to start the installation
Exchange Server 2007 Install 7
9. The entire installation takes approximately 30 minutes. When it is successful you will see this window, on which you can go ahead and click Finish
Exchange Server 2007 Install 8
10. You should update your Exchange server right after the installation. To do so, go back to the main install screen and click on Step 5: Critical Updates for Microsoft Exchange
Exchange Server 2007 Install 9
11. On the Microsoft Update site, click on the Review and install updates link
Exchange Server 2007 Install 10
12. Then click on the Install Updates option
Exchange Server 2007 Install 11
13. Last thing you need to do is to restart your new Exchange Server! Go ahead and click Restart Now and you’re done!
Exchange Server 2007 Install 12

Installing Exchange 2010 Step-by-Step

This time we'll walk through the steps required to install a fully functional Exchange 2010 server on Windows Server 2008 R2.
System Requirements

First, you need to make sure that your Active Directory (AD) environment and your Exchange server meet the minimum requirements:
  • AD forest functional level is Windows Server 2003 (or higher)
  • AD Schema Master is running Windows Server 2003 w/SP1 or later
  • Full installation of Windows Server 2008 w/SP2 or later OR Windows Server 2008 R2 for the Exchange server itself
  • Exchange server is joined to the domain (except for the Edge Transport server role)

Prerequisites

In this example we are going to install Exchange 2010 on a Windows Server 2008 R2 operating system. Before installing Exchange we need to install some Windows components. It's important that you don't miss anything here because the Exchange 2010 installer does not provide very good feedback if Server 2008 R2 is missing required components.
  1. Install the 2007 Office System Converter: Microsoft Filter Pack
  2. Add the appropriate Windows components/features
    1. Open PowerShell via the icon on the task bar or Start >> All Programs >> Accessories >> Windows PowerShell >> Windows PowerShell. Be sure that PowerShell opened with an account that has rights to install Windows components/features.
    2. Run the following command: Import-Module ServerManager
    3. For a typical install with the Client Access, Hub Transport, and Mailbox roles run the following command: Add-WindowsFeature NET-Framework,RSAT-ADDS,Web-Server,Web-Basic-Auth,Web-Windows-Auth,Web-Metabase,Web-Net-Ext,Web-Lgcy-Mgmt-Console,WAS-Process-Model,RSAT-Web-Server,Web-ISAPI-Ext,Web-Digest-Auth,Web-Dyn-Compression,NET-HTTP-Activation,RPC-Over-HTTP-Proxy -Restart. For a full matrix of the required Windows components with regards to the 
  3. If your Exchange server will have the Client Access Server role set the Net.Tcp Port Sharing Service to start automatically
    1. Open PowerShell via the icon on the task bar or Start >> All Programs >> Accessories >> Windows PowerShell >> Windows PowerShell. Be sure that PowerShell opened with an account that has rights to modify service startup settings.
    2. Run the following command: Set-Service NetTcpPortSharing -StartupType Automatic
Setting up Microsoft Exchange 2010

Exchange 2010 Installation

Now we're ready to run the Exchange 2010 installer. We'll go through a typical installation that includes the Client Access, Hub Transport, and Mailbox roles. This is what you will want to install if you are only going to be running one Exchange server. If you scale out your Exchange architecture with multiple servers then you will want to familiarize yourself with the Exchange server roles for a proper deployment.
  1. Logon to the desktop of your soon to be Exchange server with a Domain Admin account.
  2. Run setup from the Exchange 2010 media.
  3. Click on "Step 3: Choose Exchange language option" and choose one of the options (Install only languages from the DVD will be fine in most cases).
  4. Click on "Step 4: Install Microsoft Exchange."
  5. Click Next at the Introduction page.
  6. Accept the license terms and click Next.
  7. Make a selection on the Error Reporting page and click Next.
  8. Stick with the default "Typical Exchange Server Installation" and click Next.
  9. Choose a name for your Exchange Organization and click Next.
  10. Make a selection on the Client Settings page and click Next.
  11. If you want your Exchange server to be available externally then choose a domain name such as mail.myorganization.com, click Next.
  12. Make a selection on the Customer Experience Improvement Program page and click Next.
  13. If all the prerequisites are there then you can click Install.
  14. Grab a cup of coffee or take a walk while the installation process does its thing.
  15. When the installation has finished go back to the Exchange installation page click on "Step 5: Get critical updates for Microsoft Exchange."
Install Microsoft Update (if necessary) so that Windows update will check for non-OS updates, and verify that there are no Exchange updates. 
 
Now that you have Exchange 2010 installed, you will need to do some basic configuration in the Exchange Management console to get mail flowing to/from your server.
  1. Open the Exchange Management Console via Start >> All Programs >> Microsoft Exchange Server 2010 >> Exchange Management Console
  2. Expand Microsoft Exchange On-Premises so you can see: Organization Configuration, Server Configuration, Recipient Configuration, and Toolbox
  3. Under Organization Configuration >> Hub Transport >> Accepted Domains add a new Accepted Domain for the domain you wish to use for email addresses. For example, your AD domain will be listed by default (i.e. ad.myorganization.com). You will probably want to add "myorganization.com" as an Authoritative Domain.
  4. Under Organization Configuration >> Hub Transport >> Send Connectors >> New Send Connector ... >> Pick a name such as "MyOrganization Internet Send Connector" >> change the drop down to "Internet" >> Next >> Add ... >> enter "*" in the Address field and check the box to include all subdomains >> OK >> Next. Now, if you want your Exchange server to route mail directly, then click Next on the Network setting page, but if you want to route your email through an upstream provider then select "Route mail through the following smart hosts" and Add ... a mail gateway such as smtp.comcast.net. Click Next >> Next >> Next >> New
  5. Under Server Configuration >> Hub Transport >> Right-click Default *** >> Properties >> Permission Groups tab, check the box for Anonymous users. This will allow your Exchange server to accept incoming mail delivery from remote mail servers.
  6. Under Recipient Configuration >> Mailbox, create mailboxes for your existing AD users (or create a new user & mailbox)
    1. New Mailbox ... >> select User Mailbox >> Next >> Existing users >> Add ... >> select an existing AD account >> OK >> Next >> specify an alias (e.g. the AD user name) >> Next >> New
  7. If you want to use an SSL certificate for Outlook Web App, IMAP, POP, etc. click on Server Configuration and import or create the certificate

Mail Routing Configuration

Now the final piece you need to configure to receive mail is your external DNS records. The method for configuring your DNS records will depend on whether you host your own DNS or have a provider that hosts it for you. Either way you will need to create an "A" record that points mail.myorganization.com to the IP address of your mail server, and an "MX" record that points myorganization.com to mail.myorganization.com. You will also want to make sure that port 25 is open both inbound and outbound to your Exchange server.

Install a DNS Server

Applies To: Windows Server 2008, Windows Server 2008 R2

Installing a Domain Name System (DNS) server involves adding the DNS server role to an existing Windows Server 2008 server. You can also install the DNS server role when you install the Active Directory Domain Services (AD DS) role. This is the preferred method for installing the DNS Server role if you want to integrate your DNS domain namespace with the AD DS domain namespace.
Membership in the Administrators group, or equivalent, is the minimum required to complete this procedure.
To install a DNS server
  1. Open Server Manager. To open Server Manager, click Start, and then click Server Manager.
  2. In the results pane, under Roles Summary, click Add roles.
  3. In the Add Roles Wizard, if the Before You Begin page appears, click Next.
  4. In the Roles list, click DNS Server, and then click Next.
  5. Read the information on the DNS Server page, and then click Next.
  6. On the Confirm Installation Options page, verify that the DNS Server role will be installed, and then click Install.

Additional considerations

  • We recommend that you configure the computer to use a static IP address. If the DNS server is configured to use DHCP-assigned dynamic addresses, when the DHCP server assigns a new IP address to the DNS server, the DNS clients that are configured to use that DNS server's previous IP address will not be able to resolve the previous IP address and locate the DNS server.
  • After you install a DNS server, you can decide how to administer it and its zones. Although you can use a text editor to make changes to server boot and zone files, this method is not recommended. DNS Manager and the DNS command-line tool, dnscmd, simplify maintenance of these files, and they should be used whenever possible. After you begin using DNS Manager or command-line management of these files, editing them manually is not recommended.
  • You can administer DNS zones that are integrated with AD DS only with DNS Manager or the dnscmd command-line tool. You cannot administer these zones with a text editor.
  • If you uninstall a DNS server that hosts AD DS-integrated zones, these zones are saved or deleted according to their storage type. For all storage types, the zone data is stored on other domain controllers or DNS servers. The zone data is not deleted unless the DNS server that you uninstall is the last DNS server hosting that zone.
  • If you uninstall a DNS server that hosts standard DNS zones, the zone files remain in the %systemroot%\system32\Dns directory, but they are not reloaded if the DNS server is reinstalled. If you create a new zone with the same name as an old zone, the old zone file is replaced with the new zone file.
  • When they write DNS server boot and zone data to text files, DNS servers use the Berkeley Internet Name Domain (BIND) file format that is recognized by legacy BIND 4 servers, not the more recent BIND 8 format.

Installing IIS 7 on Windows Server 2008 or Windows Server 2008 R2

Introduction

You can use Microsoft® Web Platform Installer (Web PI) to easily install Internet Information Services (IIS) and applications that run on IIS. However, if you choose to install IIS manually, you can use this article for guidance.
IIS 7.0 is the Web server role in Windows Server® 2008 and the Web server in Windows Vista®. IIS 7.5 is the Web server role in Windows Server® 2008 R2 and the Web server in Windows® 7. Windows Server 2008 R2 and Windows Server 2008 operating systems have all the IIS features needed to support the hosting of Web content in production environments. Windows 7 and Windows Vista also include IIS features, but the available features depend on the operating system versions.
The Web server was redesigned in IIS 7.0 to enable you to customize a server by adding or removing modules to meet your specific needs. Modules are individual features that the server uses to process requests. For example, IIS 7.0 and IIS 7.5 use authentication modules to authenticate client credentials and use cache modules to manage cache activity. Both versions of IIS also provide:
  • A new management interface. The interface lets you quickly and easily change the settings for each Web site. It is also possible to edit the settings of a Web site in a text-based configuration file.
  • The ability to share tasks with Web site owners. A hoster with multiple sites can delegate administrative control to developers or content owners.

New in IIS 7.5

IIS 7.0 and IIS 7.5 are together known as IIS 7 or IIS 7 and above; however, IIS 7.5 and Windows Server 2008 R2 include several new features not found in IIS 7.0:
  • Microsoft® ASP.NET runs on Windows Server 2008 R2 Server Core installations.
  • Some of the extensions available to be added to the IIS 7.0 platform are integrated into the IIS 7.5 platform, including:
    • FTP publishing.
    • Web-based Distributed Authoring and Versioning (WebDAV) publishing.
    • Windows PowerShell™ snap-in for IIS.
    • IIS Administration Pack modules.
  • IIS 7.5 includes configuration logging and tracing (IIS 7.0 does not include any built-in tracing mechanisms for configuration changes).
  • IIS 7.5 includes the Best Practice Analyzer, an automated tool for helping to ensure compliance with security best practices.

Before You Begin

Ensure that you have administrative user rights on the computer on which you plan to install IIS 7 or above. Note that by default, you do not have administrative user rights if you are logged on as a user other than as the built-in administrator, even if you were added to the local Administrators group on the computer (this is a new security feature in Windows Server 2008 called Local User Administrator).
Log on either to the built-in administrator account, or explicitly invoke applications as the built-in administrator by using the runas command-line tool.

Note: You can run runas /user:administrator cmd.exe so that every application you run from that command line will be elevated, eliminating the need to use the runas syntax from that command line. 

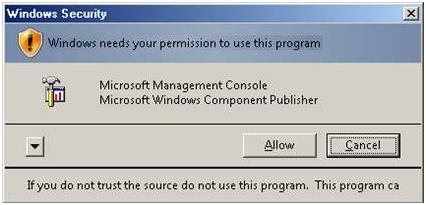
If you are logged on to an account other than the built-in local administrator account, you may see the following security alert dialog box.
Figure 1: Windows® Security (User Account Control)

Install IIS 7.5 on Windows Server 2008 R2

IIS is one of the Windows Server® server roles. IIS can be installed through the graphical user interface (GUI) by using the new Server Manager interface after the Windows Server operating system is installed.
Server Manager provides a single dashboard to install or uninstall server roles and features. Server Manager also gives an overview of all currently installed roles and features. When IIS is chosen from the Server Manager, the basic components and services needed for IIS are automatically selected. 

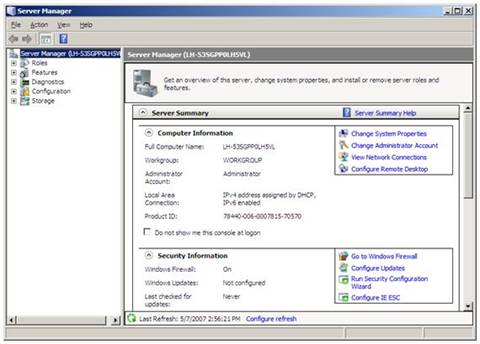
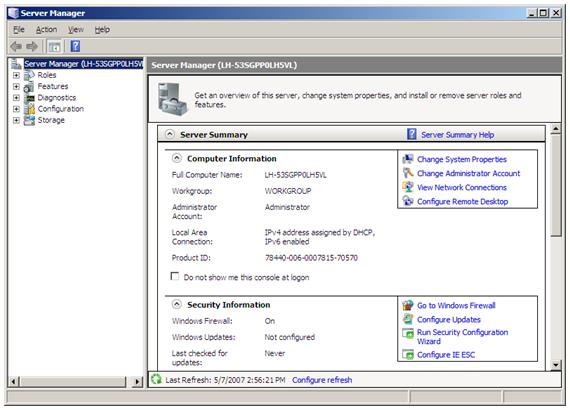
1. Click Start -> All Programs -> Administrative Tools -> Server Manager.
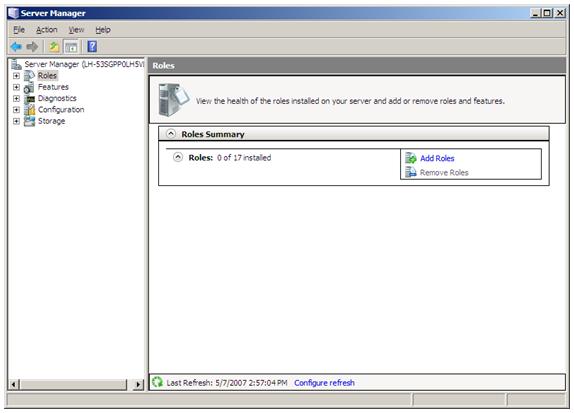
Figure 2: Server Manager
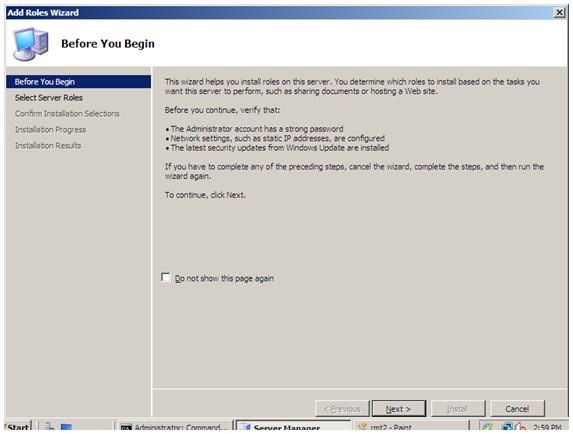
2. In the Server Manager window, scroll down to Roles Summary, and then click Add Roles. The Add Roles Wizard will start with a Before You Begin page. The wizard asks for verification of the following:
a. The administrator account has a strong password.
b. The network settings, such as IP addresses, are configured.
c. The latest security updates from Windows® Update are installed.

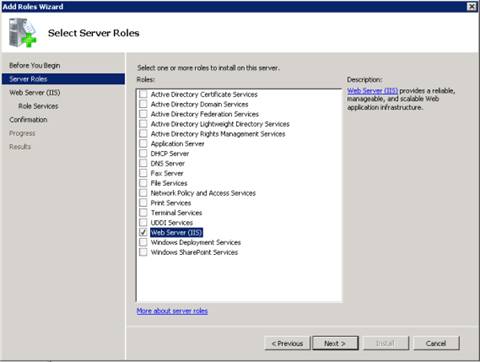
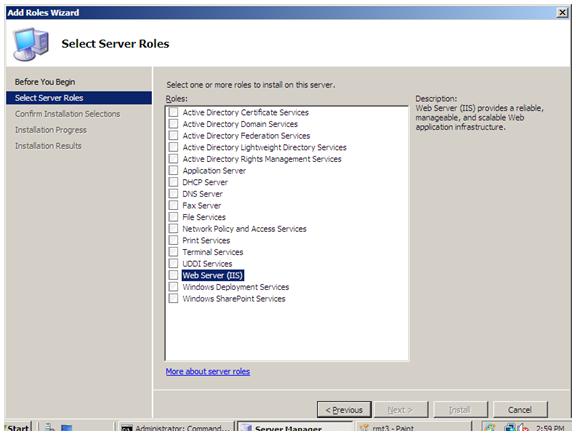
3. Select Web Server (IIS) on the Select Server Roles page. An introductory page will open with links for further information.

Note: When you use the Add Roles Wizard to install IIS, you get the default installation, which has a minimum set of role services. If you need additional IIS role services, such as Application Development or Health and Diagnostics, make sure to select the check boxes associated with those features in the Select Role Services page of the wizard.
Figure 3: Select Server Roles
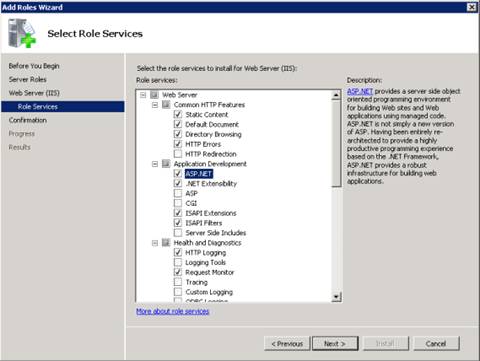
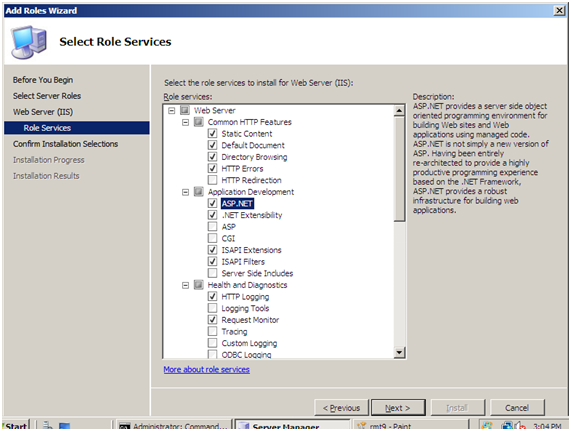
4. Select the IIS services to be installed on the Select Role Services page. Add only the modules necessary. In this case, ASP.NET is selected, and a description of ASP.NET appears in the right pane. Once desired modules are added, click Next.
Figure 4: Select Role Services
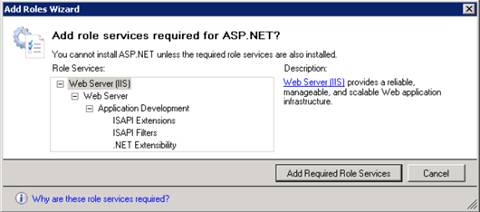
5. Add any required role services.
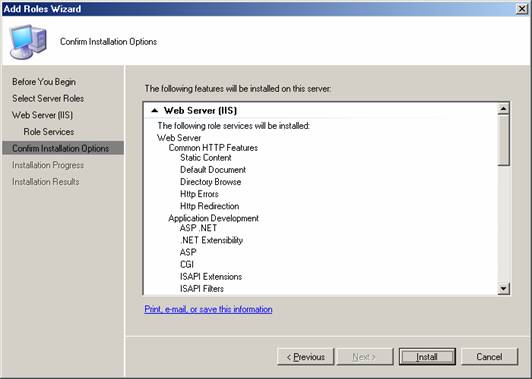
Figure 5: Wizard warning page
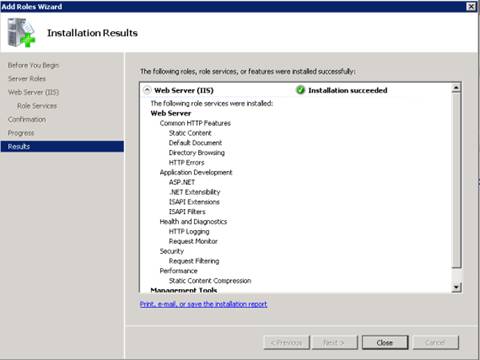
6. IIS is now installed with a default configuration for hosting ASP.NET on Windows Server. Click Close to complete the process.

Figure 6: Installation Results page
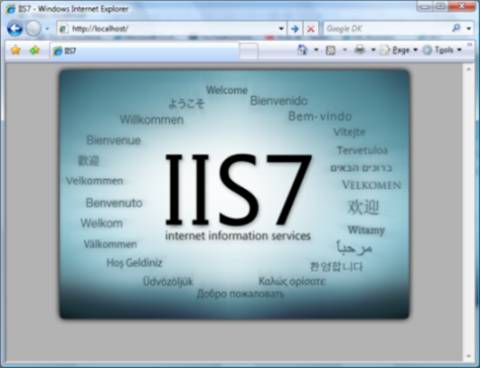
7. Confirm that the Web server works by using http://localhost.

Figure 7: Default Web site
Note: Install only the absolutely necessary IIS services to minimize the IIS installation footprint. This also minimizes the attack surface, which is one of the benefits of IIS 7 and above.

Use a Script to Install IIS 7.5 on Windows Server 2008 R2

You can also use a script to install IIS 7.5. Note that if you use this script, you get the full IIS installation, which installs all available feature packages. If there are feature packages you do not need, you should edit the script to install only the packages you require. For more information, see Installing IIS 7.5 on Windows Server 2008 R2.

To install IIS 7.5 with a script, type the following at a command prompt:

CMD /C START /w PKGMGR.EXE /l:log.etw /iu:IIS-WebServerRole;IIS-WebServer;IIS-CommonHttpFeatures;IIS-StaticContent;IIS-DefaultDocument;IIS-DirectoryBrowsing;IIS-HttpErrors;IIS-HttpRedirect;IIS-ApplicationDevelopment;IIS-ASP;IIS-CGI;IIS-ISAPIExtensions;IIS-ISAPIFilter;IIS-ServerSideIncludes;IIS-HealthAndDiagnostics;IIS-HttpLogging;IIS-LoggingLibraries;IIS-RequestMonitor;IIS-HttpTracing;IIS-CustomLogging;IIS-ODBCLogging;IIS-Security;IIS-BasicAuthentication;IIS-WindowsAuthentication;IIS-DigestAuthentication;IIS-ClientCertificateMappingAuthentication;IIS-IISCertificateMappingAuthentication;IIS-URLAuthorization;IIS-RequestFiltering;IIS-IPSecurity;IIS-Performance;IIS-HttpCompressionStatic;IIS-HttpCompressionDynamic;IIS-WebServerManagementTools;IIS-ManagementScriptingTools;IIS-IIS6ManagementCompatibility;IIS-Metabase;IIS-WMICompatibility;IIS-LegacyScripts;WAS-WindowsActivationService;WAS-ProcessModel;IIS-FTPServer;IIS-FTPSvc;IIS-FTPExtensibility;IIS-WebDAV;IIS-ASPNET;IIS-NetFxExtensibility;WAS-NetFxEnvironment;WAS-ConfigurationAPI;IIS-ManagementService;MicrosoftWindowsPowerShell

Unattended Installation of IIS 7.0 on Windows Server 2008

Automating the installation of IIS by using unattended scripts is very useful if you need to deploy multiple Web servers and want to ensure that each of the Web servers is set up with identical components and services.
In the Windows Server 2008 and Windows Vista operating systems, Pkgmgr.exe is used for unattended scripts, letting you install or uninstall optional features from a command prompt or scripts. (Note: Pkgmgr.exe replaces Sysocmgr.exe which was used in Windows Server® 2003.) For instructions and an overview of Pkgmgr.exe, 

Note: that to use Pkgmgr.exe, you must make sure you have administrative user rights on the computer.

Install IIS 7.0 on Windows Server 2008

1. To start Server Manager, click Start Menu -> All Programs -> Administrative Tools -> Server Manager. The Server Manager window opens.

Figure 8: Server Manager
2. In the Server Manager window, select Roles. The Role Summary View is displayed.

Figure 9: Start Add Roles Wizard
3. Click Add Roles. The Add Roles Wizard opens. Click Next to select roles to install.

Figure 10: Add Roles Wizard Introduction
4. Select Web Server (IIS).

Figure 11: Select Web Server (IIS) in Add Roles Wizard
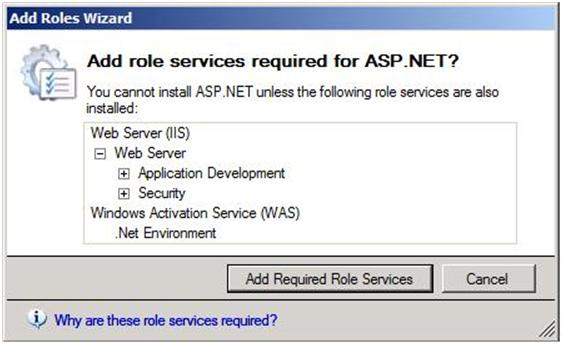
5. The Add Roles Wizard notifies you of any required dependencies; since IIS depends on the Windows Process Activation Service (WAS) feature, the following informational dialog box appears. Click Add Required Role Services to continue.
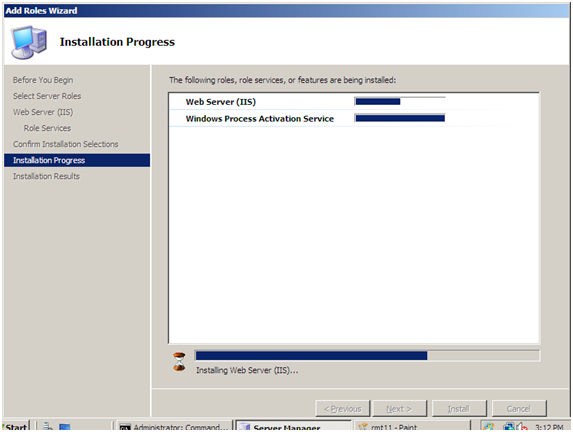
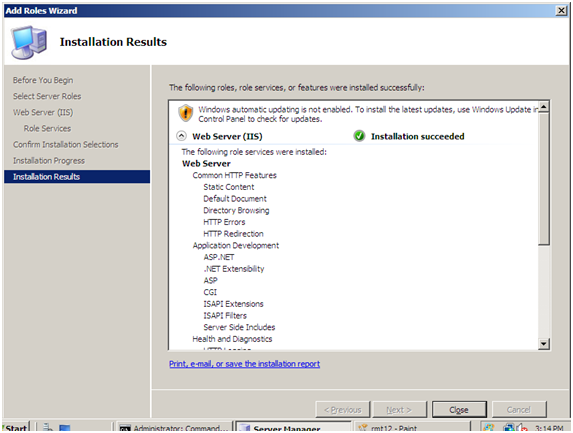
Figure 12: Add Dependencies
6. The Web Server is now selected for install. The Select Server Roles dialog box opens. Click Next to continue.

Figure 13: Selected Web Server (IIS)
7. The following dialog box and information appears. Click Next to continue.

Figure 14: Introduction to Web Server dialog box
8. The Add Roles Wizard displays a list of all IIS 7.0 features available to install as shown below. Note that features comprising the default install are pre-selected.

Figure 15: Web Server Features Listed
9. To install just the IIS 7.0 default features, click the Install button, and then proceed to Step 14. If you need to install additional features, proceed to step 10.
10. For this example, we install additional IIS features. Select the check box for ASP.NET. The Wizard warns if adding an IIS feature will also cause other features to be installed.

Figure 16: Dependency Information
11. Click Add Required Role Services to continue.
12. Continue selecting additional IIS Role Services features to install.

Figure 17: Add Features For Web Server
13. When you have selected all the features you require, click Next to continue.
14. The Wizard provides a summary of what will be installed.

Figure 18: Summary of Features
15. Click Install to continue. The Installation Progress dialog box opens.

Figure 19: Install Progress
16. When the IIS 7.0 installation is complete, the following dialog box opens. Click Close to return to the Server Manager.

Figure 20: Installation Summary
17. You can now perform a quick check to verify that IIS 7.0 is installed. Start the Windows® Internet Explorer® Web browser, and enter the address http://localhost. You should see the default IIS "Welcome" page.